

No products in the cart.
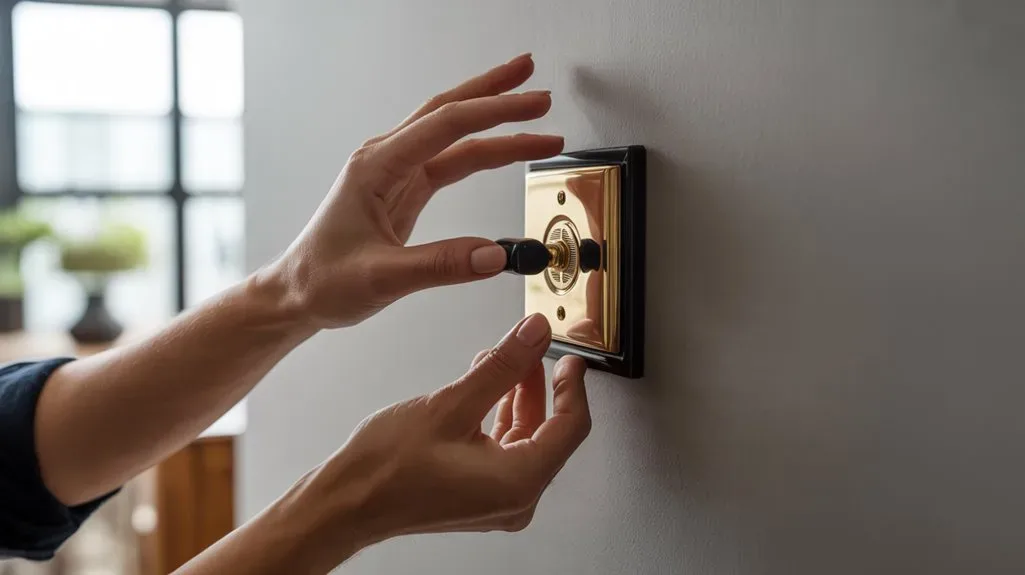

You may want to incorporate retro switches into your contemporary home for that perfect blend of vintage charm and modern functionality.
Start by selecting styles that match your décor while adhering to safety standards and electrical codes. Gather the right tools and materials, and prep your walls for installation.
Understanding wiring considerations is vital to guarantee compatibility.
Ready to transform your space with a nostalgic touch? Let’s get started on the step-by-step process.
Key Takeaways
- Evaluate retro switch materials such as brass or Bakelite that meet safety standards and complement contemporary décor.
- Ensure the chosen retro switch colours harmonise with the room’s dominant hues and lighting conditions.
- Schedule a professional safety inspection to verify existing wiring and circuit capacity for retro switches.
- Use tools like wire strippers and voltage testers to safely install retro switches in contemporary homes.
- Explore antique shops or online forums for sourcing original or reproduction retro switch parts.
Choosing the Right Retro Switch Style for Your Home

When selecting the ideal retro switch style for your home, how do you ensure it complements both functionality and aesthetics? Start by examining the vintage design of your space. Consider classic patterns and colours that align with your décor. Evaluate different switch materials like brass, ceramic, or Bakelite, which are known for their durability and timeless appeal. Choose materials that will withstand daily use while enhancing your home’s retro charm.
To confirm safety, verify that the switch materials meet current standards. Proper installation is essential, so follow manufacturer guidelines closely. Opt for switches with clear labelling and intuitive operation to avoid confusion. By combining a thoughtful vintage design with quality switch materials, you’ll create a cohesive look that marries style with safety in your home.
Understanding Electrical Requirements and Safety Standards
Before diving into the installation of retro switches, it’s crucial to understand the electrical requirements and safety standards involved. Compliance with electrical codes guarantees your home’s wiring handles the new switches safely. You should conduct a thorough safety inspection of your existing electrical system to identify any potential hazards.
To promote safety and compliance, follow these steps:
- Review local electrical codes: These codes vary by region, so check your local regulations.
- Schedule a professional safety inspection: An electrician can identify issues in your current wiring.
- Identify circuit capacity: Verify your circuits can handle additional load from retro switches.
- Inspect earthing and bonding: Proper earthing prevents electrical shocks and fires.
Tools and Materials Needed for Installation

To successfully install retro switches, you’ll need a precise set of tools and materials to guarantee both efficiency and safety. Begin with a selection of screwdriver types: a flat-head and a Phillips. These are essential for loosening and securing switch plates and terminals. Next, wire strippers are vital for safely exposing the copper wires without damaging them. Make sure to choose strippers with adjustable gauges to accommodate different wire sizes. Additionally, have electrical tape on hand to insulate connections, preventing short circuits. A voltage tester is indispensable for ensuring that circuits are de-energised before you begin work. Finally, a reliable circuit tracer will help identify correct wiring paths, avoiding potential mistakes. With these tools, you’re equipped to tackle retro switch installations safely.
Preparing Your Walls for Switch Installation
Use these steps to guide you:
- Identify wall material: Different materials require specific tools and methods.
- Mark switch location: Use a level and pencil to mark the switch’s position accurately.
- Cut the opening: Employ a plasterboard saw or rotary tool, following your markings precisely.
- Check for obstructions: Verify there are no wires or pipes behind the intended area.
Following these steps guarantees your retro switches are installed safely and effectively.
Step-by-Step Guide to Installing Retro Switches

With your walls expertly prepared, you’re ready to begin installing your retro switches. First, understand the retro switch benefits: they offer a distinct aesthetic appeal and can enhance a room’s character. However, be aware of installation challenges like fitting modern wiring into older switch designs. Start by confirming the power is off. Safety is paramount.
| Task | Tip |
|---|---|
| Secure the switch | Use a spirit level for perfect alignment |
| Attach faceplate | Ensure no wires are pinched |
| Test functionality | Power on to check proper operation |
Next, carefully secure the switch to the wall box, confirming it’s level. Attach the faceplate, ensuring no wires are pinched. Finally, restore power and test the switch’s functionality. This meticulous approach guarantees your retro switches are both functional and stylish.
Wiring Considerations for Older Switch Designs
When dealing with older switch designs, it is vital to understand the unique wiring considerations involved. Verifying switch compatibility with your home’s existing electrical system is imperative. You’ll need to master specific wiring techniques to safely integrate these retro switches. Here are key points to reflect on:
- Inspect Wiring: Verify the condition of existing wires. Older homes may have outdated or damaged wiring.
- Switch Compatibility: Confirm that the retro switch’s voltage and amperage ratings match your system.
- Earthing: Ensure proper earthing to prevent shock hazards. Older designs may lack earthing wires.
- Wire Connections: Use appropriate connectors and secure all connections tightly to avoid loose wires.
Enhancing Aesthetics With Coordinated Retro Accessories

To enhance your space with coordinated retro accessories, start by selecting vintage hardware that matches your retro switches, ensuring it fits securely and complies with safety standards. Pair these elements with decorative lighting fixtures that complement your chosen theme, paying close attention to installation instructions to prevent any electrical hazards. Finally, harmonise your colour schemes by selecting hues that accentuate the retro style whilst maintaining a cohesive look throughout the room.
Matching Vintage Hardware Choices
Choosing the right vintage hardware can greatly elevate the charm of your retro switches, creating a cohesive aesthetic. It’s crucial to reflect on vintage styles and hardware finishes that complement the switches and the surrounding decor. Begin by evaluating the era you want to emulate. Each period offers distinct design elements, so focus on details that fit your vision. For safety, verify all hardware is securely attached and compatible with the existing electrical system.
Here’s a checklist to guide your selection:
- Material: Opt for durable metals like brass or bronze for a classic look.
- Finish: Choose finishes—polished, antiqued, or brushed—to match the vintage style.
- Compatibility: Confirm the hardware fits your switch plates and wall structure.
- Installation: Follow precise instructions to avoid damage or electrical hazards.
Coordinated Decorative Lighting Fixtures
Incorporating coordinated decorative lighting fixtures is a strategic way to enhance the aesthetic appeal of your retro switches while maintaining historical accuracy. Start by selecting fixtures that complement the era of your switches. Prioritise LED compatibility to guarantee energy efficiency and longevity. When installing, consider fixture placement carefully. Position fixtures to provide balanced illumination without overshadowing the unique style of your retro switches. For safety, always turn off power at the circuit breaker before installation. Use appropriate tools and verify that the fixtures are securely mounted to support their weight. If unsure, consult with a professional electrician to avoid potential electrical hazards. This approach not only preserves the vintage charm but also integrates modern functionality seamlessly.
Harmonizing Color Schemes Effectively
A harmonious colour scheme can transform your retro switches into a cohesive design statement. Ensuring colour harmony and design balance is essential for aesthetic appeal. Start by selecting a palette that complements your existing decor. Consider the following steps to achieve effective colour coordination:
- Assess the existing room colours: Note dominant hues and undertones to avoid clashes.
- Select complementary shades: Choose colours that enhance and balance your room’s overall look.
- Incorporate retro accessories: Use vintage-inspired items in similar tones for consistency.
- Test colour samples: Before finalising, use swatches to visualise the effect in different lighting.
Maintaining and Troubleshooting Retro Switches

To ensure your retro switches function smoothly, regularly inspect them for common issues such as flickering or sticking. Clean each switch carefully using a dry, non-abrasive cloth to avoid damage, and verify that replacement parts are readily available for quick fixes. Always switch off the power at the circuit breaker before performing any maintenance to prioritise safety.
Common Retro Switch Issues
While retro switches can add a touch of vintage charm to any space, they often come with their own set of challenges requiring careful maintenance and troubleshooting. One common issue is switch compatibility. Retro designs might not align with modern electrical standards, leading to potential functionality problems. You’ll want to ensure proper fit with existing wiring to avoid any electrical hazards.
Retro design limitations can also lead to physical wear or faulty mechanisms. Regular inspection is essential. Here are a few issues to watch out for:
- Loose connections: Tighten screws and check wiring periodically.
- Worn-out contacts: Replace contacts to maintain efficient operation.
- Incompatible bulbs: Use bulbs that match the switch’s voltage and wattage capacity.
- Stiff mechanisms: Lubricate moving parts to ensure smooth operation.
Prioritise safety by turning off power before performing any maintenance.
Cleaning and Care Tips
Even though retro switches can be a stylish addition to your home, keeping them clean and well-maintained is crucial for their longevity and safety. Start by turning off the power to the switches to guarantee safe handling. For effective cleaning techniques, use a microfibre cloth slightly dampened with a mild detergent solution; gently wipe the switch surface. Avoid abrasive materials that could damage the finish. Incorporate a regular care routine by inspecting switches monthly for dust accumulation and loose screws. Tighten screws as needed to maintain secure connections. Pay close attention to any signs of wear or discolouration, as these could indicate underlying issues. By following these steps, you’ll guarantee your retro switches remain both functional and aesthetically pleasing.
Replacement Parts Availability
When maintaining and troubleshooting retro switches, ensuring the availability of replacement parts is essential for seamless repairs and longevity. Begin by researching vintage switch availability in specialised hardware stores or online marketplaces. Prioritise safety by always turning off the power supply before handling any electrical components. Here are some steps to take into account:
- Check local antique shops: They may have original vintage switches or know where to find them.
- Explore online forums: Connect with enthusiasts who might offer leads on hard-to-find parts.
- Evaluate reproduction switch options: Modern reproductions can match the original aesthetics while offering improved safety features.
- Consult professional electricians: They can provide insights into sourcing and safely installing parts.
Frequently Asked Questions
Are Retro Switches Compatible With Smart Home Systems?
When integrating retro switches with smart home systems, you’re blending retro technology with modern design. Confirm compatibility by checking if the retro switch supports smart features or requires additional modules. Use a smart hub for seamless integration. Always follow electrical safety standards; turn off power before installation. If unsure, consult a professional to maintain safety and functionality. Remember, blending styles can enhance your home’s aesthetic whilst retaining modern convenience.
Can Retro Switches Increase My Home’s Resale Value?
You’re wondering if retro switches can boost your home’s resale value. Indeed, they can enhance aesthetic appeal, attracting buyers with a preference for vintage charm. Make certain the installation is safe and adheres to electrical codes. Use wiring diagrams and follow detailed instructions to seamlessly integrate them. By meeting buyer preferences, you create a unique selling point. Always consult a professional electrician to assure safety and functionality in your home.
How Do Retro Switches Impact Energy Efficiency?
Retro switches can impact energy consumption by not always integrating modern efficiency features like dimmers or smart controls. While their aesthetic appeal enhances your home’s charm, be mindful of potential energy waste. To guarantee safety, verify that these switches meet current electrical standards. Consider consulting an electrician for installation to avoid hazards. Balancing vintage style with energy efficiency and safety will maintain both your home’s allure and its functionality.
Are Retro Switches Available in Eco-Friendly Materials?
Yes, retro switches are available in sustainable materials. When selecting eco design options, you should check for materials like recycled metals or certified wood. Confirm the product meets safety standards, verifying any eco-labels or certifications. Look for products that use minimal packaging and have a clear end-of-life recycling plan. By focusing on these aspects, you can make environmentally conscious choices without compromising on quality or safety.
Do Retro Switches Require Special Cleaning Methods?
When considering cleaning techniques for retro switches, you’ll want to focus on gentle methods to avoid damage. Use a soft microfibre cloth slightly dampened with a mild detergent solution. Avoid abrasive cleaners and excessive moisture, which can harm the switch. For maintenance tips, regularly check for dust build-up, and ensure proper drying to prevent electrical issues. Safety first: always turn off the power supply before cleaning to ensure safe handling.


Related posts

For anyone renovating a period property, the smallest details often carry the greatest weight. Original fixtures (especially electrical hardware) help preserve the character and authenticity... Continue reading
Did you catch our latest article? We've explored how the light switch has evolved over the years, from candlelight to the very first electric light,... Continue reading

When it comes to designing a home, most people think about the big elements first - flooring, paint colours, cabinets, maybe even statement lighting. But... Continue reading
Bakelite switches have long been a favourite in heritage, period and retro-inspired interiors. They bring a timeless elegance, a nod to early 20th-century design and... Continue reading
Following launch our new website, we wanted to take a moment to share our story - one that starts with a quirky idea, a family... Continue reading
